Sunday 18 November 2012

X-wing Storage

Having now got the Star Wars X-wing bug, I now have purchased 3 boxed sets which gives me 3 x-wings and 6 Tie Fighters. I also have an Advance Tie and 3 A wings.

I have purchased a Plano 5231 carring box of Amazon.Com as teh Uk site does not have these for sale.

The Plano 5231 comes with two layers. The aditional layer with small compartments sits on top the of the lid to the main compartment. this allows the storage of small componants. Each row of both layers can be configured to suit the users needs (See pictures below). This is how I configured mine.

The Plano 5231
Top layer, where I keep all my tokens.
 

Bottom layer where the ships and the cards are located.

Monday 5 November 2012

Star wars - Cue Music ......


X-wing has commeth in to my collection. Having seen this knocking around for the last few months, I finally sucummed to temptation and purchased a couple of starter sets and the advanced Tie Fighter and Y wing.

Having ordered it of E(vil)Bay, it arrived a few days later and I was deeply impressed by the quality of Everything.  I was already familiar with the rules, having watched a few vids on you tube and Fantasy Flights web site.

Then the inevitable happened I turned over the TV and Hey presto STAR WARS was on and that is it I am now hooked. Every time I contemplate on playing this game or read the rule booklet the Star wars theme tune plays in my head and every time I pick up a Tie fighter the Scream, screams at me.


So my friend Scott comes round and I drag him into the shed to play a game and now he is hooked. The rules are simple so no arguing and the chances to make mistakes in the manoeuvre phase is unlimited.. We have had several ships turning the wrong way because we were not careful enough to double check the orientation.

So Now I await the release of A wings and the Millennium Falcon.....And now to purchase a sound track CD for back ground music.


GAME REPORT

Our first proper game was the Shuttle mission with myself playing the Rebels and Scott the Imperium.  Scott went straight for the Shuttle ignoring the X-wing where possible.

He only targeted the X-wing if he did not have a shot at the Shuttle. The Shuttle was almost destroyed. But the X-wing killed a Tie fighter Right at the crucial moment.

But with One turn to go before the shuttle left the table a reserve Tie came on right in its path, blocking a straight run for the table edge.

It all came down to us both making crucial manoeuvres to either protect the Shuttle or destroy it.
First to move was the shuttle and it banked left, the reserve tie moved straight past the shuttle giving it no chance of shooting it, it was down to the second Tie to bank hard right.....

But  Scott misread his dial and the Tie banked hard LEFT! meaning it did not have a shot at the shuttle.

Worst to come was that my X-wing should have banked Hard Right... but I too had misread the dial and my X-wing turned away from the combat banking hard LEFT!!!!!

Next turn the shuttle left the game...Rebel win.


We replayed the turn with the correct manoeuvre's and in that alternate universe, the X-wing missed the tie and the Tie blew up the shuttle.

So it just goes to show that you need to double check your dial before placing.


Tie fighter about to be blasted by the X-wing.

Even with target lock that tie survived.

Scott looks on as his Tie fighter faces death.

Erm...Ramming Speed.

Scott contemplates his next move.
 
Me caught reading the rules whilst Scott sneaks to the toilet.

Star Wars brings the kid outta you...Big Style....
so
DIE REBEL SCUM!!!!!!!!!!!!!!!!!!!!!

Sunday 23 September 2012

Dystopian Wars - Fleet updates

Here are my two Dystopian wars fleets:

Britania

The Fleet around 1000 pts
 

Sky Fortress, should have modeled this on the one from Sky captain.


Under side of Sky fortress


Dreadnought

FSA

Fleet at around 850 points


Flying robots that can't see where they are going...HOW COOL!!

 
There will be more to come, more FSA stuff on my work bench awaiting there turn.


Saturday 15 September 2012

Peipers Charge Game 3..The End

Peipers Charge Game 3....or should that be Peipers Whimper


Game 3 of Peipers charge, the PDF for can be found here: http://www.flamesofwar.com/hobby.aspx?art_id=3460.

Game 1 can be found here : Peipers' Charge Game 1
Game 2 can be found here : Peipers' Charge Game 2

THE GAME

Having missed the dead lines for my objectives, the Americans got two instant reserves.

The German turn 1 saw the King tigers with what was left of the Fallshirmjager platoon riding on the back of the King Tigers, along with the panzer IV company and the ever attentive Whiblewinds.

The ME262 put in an instant appearance and tried in vain to stop the American engineers from blowing up the bridge that they were defending it. With the scrap yard tank platoon out of range even to the mighty guns of the Tigers, the turn was handed over to the Americans.

ME262 attacks Engineers trying to blow up the bridge.

Wirblewinds disguised as SDKFZ AA's.

The American tanks arrived from reserve a mere 24" in front of the advancing Germans and started
stripping away the German Air Defence. The German's responded by knocking out 2 tanks and bailing 2 more, but the platoon passed its motivation.
The American tank platoon takes a beating but hangs annoyingly on.

An ominous rumble crossed the field of battle as the US engineers suceed in blowing up the bridge, denying the Germans a valuable route, leaving Peiper with only one other route through the town held by the American infantry and two tank platoons. The USAAF turns up the heat and braves the reduced AA fire and hit the Panzer's hard. Bailing 1 Panzer IV, Destroying 1 Panther and bailing 2 more. Another Pz IV was destroyed by the Sherman's.
Combined Air attack and fire from the Sherman's cause casualties amongst the Germans.
 
This seriously put a crimp in the Germans day. In the previous games the Germans relied on their AA defence now this had been seriously curtailed and the shock of losing two vehicles must have shaken the other crews aim as now they could not hit anything. The German armour regrouped and continued its advance.
Panzers advance
The Germans had to now inflict as much damage as possible on the US armour. The German infantry arrived followed the tanks knowing that they will be needed soon. The Tigers moved through the town, safe in the knowledge that their armour was almost impregnable. The result of the German fire decimated the two US tank platoons to the front, but they still refused to quit the field.
Meanwhile another US tank platoon moved into range on the Left flank of the German Tigers. Try as they might their rounds bounced off the side of the these German monsters, so in frustration their attention turned towards the Infantry, with two transports burning and another flack vehicle bailed in came the Thunderbolts, screaming through the hail of 20mm AA rounds they found their mark and wiped out the two infantry platoons, leaving the Germans with no infantry support.

With their infantry wiped out and the AA cover almost gone the German Armour advance quickly towards the American Infantry, their guns blazing s they went. With the remaining American tanks now either destroyed or routed the Germans had to deal with the infantry platoon blocking their way. The mighty Tigers crashed into the infantry, with bazooka shells bouncing of their armour the Tigers killed one stand which forced the Infantry to retire deeper into the cover of the wood behind the village. All the Germans had to do now was stay out of range of the US tanks on their left flank and clear the woods of the infantry and it was a clear run to the table edge.

Thunderbolts rain down fire upon the advancing Panzer's.

The Germans were in for a nasty shock as two US parachute platoons started advancing up the road towards them, so now the Germans had 3 infantry platoons to deal with. With rounds bouncing of the flanks of the mighty King Tigers, the US needed a miracle and it arrived in a flight of 3 Thunderbolts.

In they swooped and all German hopes for a victory evaporated in one strafing run. The Thunderbolts rockets ripped into the top armour of the Panzer's and as they flew back to base to re-arm It left 3 burning tanks behind them with 2 more bailed. The Panzer IV's had, had enough and quit the field.
The last panther platoon also decided to call it a day and followed the Panzer Iv's back home, Peiper now only had left the King Tigers. Knowing this was not going to be enough he ordered their retreat, He had failed, Hitler will not be too pleased.

Thunderbolts swoop low over the Burning Panzer's

Post Game:

Ouch! that hurt. I made the mistake of bringing all my Armour in on the top road that lead to the town, as I knew I would not make the bridge at the other end of the table before it was blown.
I did not apreciate how close the American reserves would arrive and when they did they targeted my Air defence with good results. My return fire was pitiful and after that the AA was non effective.

The scenario does not favour the single table aproach and should be played as is, with three tables side by side as some of the American deployments and reserves arrival points make the game very difficult to play as the German and favours the Americans.

Okay you have 4000 points of Germans but only allowing 3 platoons a turn on the road hindered them badly. Some of the American deployment areas and reserve entry points need adjusting if played on single tables one at a time.

We may play this again at some point if we can secure the space for the 18 foot ong table that the scenario ultimatly requires.

ME262's: These did not realy hinder the Americans much and failed to turn up most of the time (But that was more to the fact we agreed on a score of 6 needed for them to arrive), so adding them was not as detrimental as we first though.

Blowing the Bridges: This should be reduced to one throw a turn, not one throw per engineer team as it makes it too easy for a bridge to be blown.

Air cover: How historical this is I don't know as I allways thought that theGermans attacked because the weather grounded the Allied air. Yes we know that the ME262 is not realy historical but we used it for fun.

Snow: This has no effect in the game other than to slow the Panzers down. If snow is deep enough to slow a tank down its deep enough to slow a man down.

Woods: The woods do not block LOS as they deem them as being spacious plantation like. I sugest you look into this your selves, as every History book I have mainly shows deep dense forests with the odd avenue through them. This is why the Germans invaded France throug them in 1940 and hoped to do so again with the Ardennes offensive as the Allies deemed them in both cases unsuitable for an Armoued attack.
I sugest that these are played as proper woods, blocking LOS and neededing bogging checks.


Monday 10 September 2012

Work in Progress - THE SHED and the crap

As some of you may have noticed there is not much gaming in the shed going on. Well one reason why was as stated earlier all the Crap I had in there.
The Crap!

I pulled all the crap out of the shed and have dismantled the old table in readiness for a new one I am having built. So the shed looks like this:
An empty'ish Shed.
I have finished re-enforcingthe floor and laid a new peice of carpet, I have also now finished putting a base coat of white on the walls (Started bit is shown).

For the Observant personages out there, yes that is a 84mm CG and a Law66 hanging on the wall, Above the camera, above my head is a 81mm Mortar, The Cg and the mortar are 1:1 replicas: Why? I hear you ask. Well my other web site may explain www.forces80.com.

Hopefully my table will be here by the end of the week and I can look forward to a rather tidy shed.
Cia
Jon

Tuesday 21 August 2012

Peipers Charge - Game 2

Peipers' Charge Game 2 of 3


Following on from our first game, we now have concluded the second game in the Peipers' charge scenario found in July's Wargames Illustrated.

The Game

This game went on for a long time and so many turns. This being the case I will not do a usual turn by turn account.

The table was set up as per the scenario and the Americans deployed. Right on top of the German entry point was a choke point. A single bridge was defended by a US blocking detachment who not only placed barbwire on the far side of the bridge but also mined the road over the bridge. A trench line sat off to one flank an this set up cost the Germans valuable time.
ME262's attempt to prevent engineers from blowing up a bridge.


German infantry attempt to clear the way.

The Germans had reached the exit point in game 1 in 8 turns, they now had a further 8 turns to reach one of 2 exit points. This was going to a tough ride and the game started badly taking 6 turns to fight their way past the blocking detachment, loosing 2 Panzer IV's and a Panzer grenadier platoon.

The German infantry had been depleted trying to force the way through the blocking detachment causing heavy casualties. mean while whilst the infantry were being slaughtered the Fallshirmjager platoon cleared the mines from the bridge and the first panzer platoon started crossing headed by Peiper him self. With the loss of 1 infantry platoon and another down to half strength along with the remnant's of a Panzer IV platoon, it was left down to the Panzer's who had to go in and hit the trench line hard.
German Panzers cue up to use the bridge whilst trying to dislodge the stubborn US detachment.
Mean while the Americans blew the bridges preventing a straight run, so the attack had to turn towards the only bridge left leading into a town defended by a towed AT battery and a Armoured rifle platoon. With the Panzer's now crossing unhindered they raced towards the well defended town.
Slowly the rest of the column arrived and the Siggs started to pound the buildings. Shot after shot hit the buildings but the US infantry proved to stubborn and would not yield.
US engineers blow the first bridge.
A Panther platoon grinds the defending  US detachment  asunder.

The Luftwaffe's super fighters had better luck and a solitary ME262 managed to locate the towed AT battery in a wood and strafed the platoon killing 3 guns, with the final gun crew running away in fear that they would be next.
The assault on the town defended by the Armoured Infantry was not going to plan.  Shot after shot failed to find its target and those that did the Infantry just shrugged off. After a few turns the Germans committed a Panther platoon. This did not go well and the defensive fire from the Bazooka's left 4 burning Panthers. After a couple more turns of fire eventually a building was cleared of infantry that had been blocking the bridge and the Panzer's rolled into town. The last Panzer IV platoon crossed the bridge and assaulted one of the houses forcing the infantry inside to retire. With two tank platoons in the town pounding the buildings at point blank and fire from the Sigg's finally became too much for the US infantry who surrendered.

ME262's attack the towed TD platoon killing 3 teams.

Ooops...That tank assault did not go well.

Panzer's start to pour into the town.
It was now late in the evening and after the Panzer's had cleared the town we called it a day. All that stood between the exit and the Panzer's was a couple of stands from the engineer platoon who were slowly trying to move across the table to block the Panzer's route to the exit point.

With the Germans missing the turn dead line this meant that the US now started game 3 with their reserves on table from turn 1.

Post Game

Geez that was tough, The roadblock so close to the table edge caused me a major headache, I either had to go through the minefield or through the infantry defending it. It is amazing how tough a 4 team unit can be. They saw off 2 Infantry platoons and the remnant's of a Panzer IV platoon before I decide to commit the Panthers. Maybe I should have done that turn 1 but I hoped to be able to clear the infantry without exposing my tanks.
Unable to bring the maximum of 3 units a turn that I was allowed cost me time, and time is not what I had. The Me262's saved the day taking out the towed Tank destroyer platoon who had deployed as a result of me killing the security teams.

With the bridges being blown, it forced me to take the only route left open, straight into a town full of Infantry armed to the teeth with bazooka's....

I was hoping the 150mm Sigg's would do the job but no, the damn infantry shrugged off hit after hit. It is amazing how strong infantry can be against armour when they are in buildings. I was unable to move into the town without assaulting the two buildings nearest the bridge as the infantry inside used their invisible force field to prevent me from passing them.

I was a bit rash sending in the Panther's but they were the nearest unit and I had to force the issue, all I can say about that is next time I see Americans in buildings with Bazooka's I'm going home.
The panzer Iv's with their Shurtzan were the way forward as they had the spacial save which would allow them to tackle the bazooka threat and they did in style, surviving several hits during the assaults.

Peipers' charge in the magazine is played over 3 tables, side by side. Unfortunately we do not have the space for that so opted to play the single games instead and unfortunately the writers did not think too well about how the Americans would deploy and how it would affect single table games.
The Blocking detachment deployment area was 12" square right on the table edge and my opponent took advantage of this but left me just room enough to fit a Panzer IV on table, he could have if wanted to have placed the minefield on the table edge and I would have been in real trouble.
If we had been playing over 3 tables there would have been room to flank this obstruction and bring the columns weight of fore to bear as it was the Germans suffered.

The Me262's as said, saved a protracted fight to the death with the relocated 76mm guns. These had a commanding view of the battlefield from a wood towards the town I was struggling to clear. If these had been lobbing long range shots at me, I would have lost quite a lot more.

Lastly the USAAF and their impact on the game. The only impact the Thunderbolts had when they turned up was in them hitting the ground after being repeatedly shot down by the Whirblewinds.
So how the authors of the scenario managed to loose anything to them is beyond me, These stayed at the heart of my army and provided an affective umbrella against the air attacks.


The end, well all most....

Total German Casualties

1 full Infantry platoon.
3 infantry teams from the 2nd infantry platoon.
5 Infantry teams from the Fallshirmjager platoon.
4 Panther's.
4 Panzer IV's.

Saturday 4 August 2012

FOW - Battle for Hondegham

The Defence of Hondeghem:27th May 1940


By the evening of the 26th May the defence of Hondeghem was in place. Two 18 Pounder guns, I and J Sub-Sections were placed outside the village on the Rue de Staple. The other two guns, K and L Sub Sections were placed close to the village church, to be used as defence in depth. All guns were to be used in the anti-tank roll. The HQ location under command of BSM Millard can be seen in the sketch map below and had its communication vehicles parked to the side. The rest of the soldiers were were tasked with digging in and blocking roads. By the end of the day most were placed at strategic positions throughout the area which in the main were looking out of second floor windows armed with Bren guns and A/T Rifles.

This is the second game I played of this, The first was using Rapid Fire (See earlier post) to which I use dthe map within the rules. A little bit of research and I made up a table to represent the above.

Looking from the South East towards the outskirts of Hondegham
German Forces: C/V
Co in Pz1 CMD tank
1 platoon: 3 Panzer 1
1 lorried platoon:
cmd std + 50mm mtr
3 sections each: 3 rifle teams
3 lorries
Above deploy within 12" of the table edge.
Immediate reserves (Start with 2 dice), scattered deployment (1,2 enter via South West road, 3,4 enter along deployment edge, 5,6 enter via South East corner)

They must arrive in following order:

1st: Armoured Infantry Platoon:
cmd stand + 2 sections each 1 halftrack with 2 rifle/Mg stands.
2nd: Weapon platoon:
Cmd stand + 1 section: 2 HMG stands + 1 Section: 2 81mm mtr's
2 Lorries
3rd: Inf Gun platoon:
Cmd std + Observer std + 2 75mm IG + transport
4th: Reduced Infantry platoon:
Cmd stand + 50mm + 1 rifle section of 3 Rifle stands
5th: Panzer Platoon:
3 Panzer 38T
6th: IG platoon:
Cmd Sig33 IG auf panzer 1

The Outskirts of the town must be at least 24" away from the German Deployment area.

Looking down the South West road towards the outskirts of the town.

British Forces Defending the town:
CO + 2IC Territorial R/T
Rifle Platoon: Cmd std + 2" Mtr std, 3 sections each: 2 Rifle/MG Std's + 1 ATR Rifle Stand
Artillery battery: RHA (Deploys either end of the town at end of roads leading into town)
Cmd stand + 2 Batteries each: 1 18pdr gun F/V
Delayed reserves: Regulars C/V
Rifle platoon: Cmd std + 2" mtr + ATR
3 sections each: 2 rifle/Mg stands
2 Lorries

British Deployment special rules
18pdrs deploy at either end of town facing down roads.
British Platoons may deploy sections out of command distance of other sections/HQ, but must deploy with in command distance within the section. All Out of command Sections/Guns are classed as in Command distance for all motivation tests and movement.

Victory Conditions
Germans win if Both guns are destroyed before Turn 10
British Win if at least 1 gun survives to Turn 10.

Thursday 2 August 2012

The Defence of Hondeghem:27th May 1940, Rapid Fire

I decided to dig out an old set of Rapid Fire rules as a friend commented how he used to enjoy playing with them.
Remembering that there was an Early War scenario with in the pages of the rule book; I wanted to see if I was able to convert it to FOW and see what the different out comes would be if played with both sets of rules.

The Defence of Hondeghem

Looking towards Hondeghem from the German entry point.

German Order of Battle:

1st Wave
Panzer platoon: 3x Panzer 1
Lorried Infantry Platoon: 36 Figures

2nd Wave
2 Infantry Sections in Half tracks: 20 Figures
1 Towed 75mm IG
1 Lorry with 2 HMG's

3rd Wave
CO in Panzer 1 command
Plt HQ in Half track with 37mm: 6 Figures
1 lorried infantry Section: 10 Figures
1 Lorry with 2x 81mm Mortars
Panzer Platoon: 3x Panzer 38T
4th Wave
1 Towed 150mm IG
1 Towed 75mm IG

British Order of Battle

CO; Captain N.B.C. Teacher
'F' troop 2 18pdr Guns + CO: 10 Figures
2 Dragon towing vehicles
Radio Truck
Searchlight detachment with 4 Boys ATR: 38 Figures

Reinforcements (from turn 5): 2 trucks with 14 figures.
18PDR protecting one of the roads into Hondeghem.
The 18 Pdrs were set up protecting the two roads into the town that the Germans would advance down. The Infantry were split into 3 squads and spread evenly across the front of the Town using the houses and walls as cover.

Turn 1 saw the first of the German forces to arrive. 2 of the Panzer 1's moved straight down the road towards the town halting near a farm allowing 2 infantry sections to de-bus from there transport and move up behind the Panzer's. The 3rd Panzer 1 escorted the last infantry section to the top road into town, as to force the 18 Pdrs to split there fire. The British opened fire with the 18 Pdr's but failed to find their targets.
Panzer 1 advancing supported by infantry.

Looking down the second road towards the waiting 18pdr.

Turn 2 saw the expected reserves failing to turn up, so the Panzer 1's cautiously moved towards the town as the infantry fanned out. The panzer 1's started to fire their machine guns at the 18 pdrs to no effect. Like wise the 18pdrs were struggling to find their mark, missing the panzer 1's. A lucky Long range shot from an ATR in a house lightly damages the lead Pz 1.

Turn 3. With the arrival of the Second wave the Germans advanced more openly. The armoured infantry in their half tracks roared up the road behind the Panzer 1's whilst the 75 mm moved to find a better position the other side of the farm, and the HMG's de-bused and moved through the farm. The panzer 1's manage to kill one of the gun crew of the first 18 Pdr. The Battery CO promptly takes the dead gunners place.
Germans advancing along either side of the road with the Panzer 1's almost at the town.
Again even at point blank range the 18pdr's are unable to hit the Panzer 1's. luckily for the British an ATR found it mark and heavily damaged a Panzer 1 stunning the crew for a turn. Both sides suffer light casualties amongst the infantry from a smattering of rifle fire.

Turn 4 saw the arrival of the Third wave, with the Pz 35(T) (I used Panzer 35(T)'s in error but hey they are similar tanks to the 38(T)) moving to assault up the middle as to provide cover for the two routes of attack. The now de-bused armoured infantry advance towards the 18 Pdr which now fires direct HE at them killing 3 (Ouch). The Exchange of rifle fire continues to no great effect and once again the German armour avoids getting hit.

Turn 5 began with the arrival of the fourth wave, which moved along the road to find a good firing position. The crew of the 18pdr on the top road were mowed down by the flanking Panzer 1, with the sole survivor sucomming to an grenade thrown by the advancing infantry. The gun on the bottom road suffered several more casualties and the two flanking infantry squads also took a few too many casualties from the massed machine gun, rifle and direct HE fire from the advancing Germans.
The British now hard pressed are relieved to see that reserve infantry sections arrive, which race towards the town. The Searchlight command runs towards the surviving 18 Pdr which is under attack by the Half tracks and the accompanying infantry. The British left flank Infantry pulled back into a house as they were suffering far too many casualties from an advancing infantry section. One of the infantry men in the middle squad run over towards the 18 Pdr using the wall as cover and throws a grenade at the armoured infantry section killing 3, along with 3 more casualties from the 18 Pdr firing HE at point blank range and another 1 from the Searchlight commander leaves the Armoured infantry with a morale test.
In revenge the right flank infantry fire their Boys ATR at the flanking Panzer 1 and with luck blew it up, at last the first armoured casualty. The ranks of the German infantry who had thrown the grenade was raked by machine gun and rifle fire causing heavy casualties.
The Germans put the British under pressure.
Turn 6 See's the Armoured infantry fail a morale check and they retire from the battle field. The remaining panzer 1's push into the town and the German infantry platoon start their House to house clearance. The defenders now struggled to prevent the German infantry breaking into the houses that they were defending and heavy casualties were suffered on both sides. The German Armour machine gun the last 18 Pdr but do not kill enough of the crew. The panzer 35(T) decide to fire over the heads of the infantry but cause no casualties. The British now have to take a morale test for the guns to which they pass but only just. The Searchlight commander helps man an 18 Pdr to keep it firing. May be due to the crews inexperience it fails to hit anything...AGAIN!. The Infantry have better luck with the AT Rifles claiming another Panzer 1 and one of the Pz35(T) and force the German Infantry to take a morale test.

The view from the top road as the British reserves arrive.
Turn 7 and the German Infantry grimly hold on and carry on their assault of the British positions, turning the tables and forcing the British to also take a morale test. The 150 mm SIG decides to fire upon the 18 Pdr reducing it and its crew to a smouldering crater. Without the 18 Pdr to hold up the advance the British were now in trouble. Meanwhile the German Mortars find there targets and cause casualties amongst the advancing  British reserves. The Searchlight platoon pass their morale test and grimly hold on causing more casualties on the German infantry.  The reserves arrive just in the nick off time to throw an AT grenade at the surviving Pz1 which in turns blows up..."Howzat!" shouts the throwing soldier who used to play for England's cricket team as a bowler before the war.

Turn 8, "They think it's all over.... but it is now!!" The German infantry fail a motivation test and fall back the British have held on. Without any supporting Infantry the German armour is unable to forces the British Infantry from the buildings so pull back to await more troops.
Final German positions, the town still in British hands.
Post game
Rule wise as I was not ofey with all the rules as I last played them 15+ years ago, so I was trying to read the rules as I went along. It got quite messy when it came down to the house clearance and I defently got some of the rules wrong...  Okay maybe a lot wrong.

I played the 18 Pdrs as Non AT guns which added a -1 to the dice roll which meant they could not hit the armour at long range. To be honest the dice throws were the most apauling I have ever seen them, throwing a  5 or 6 was elusive until the British morale time, when they threw 6's.

I would like to play this game again after reading the rules some more, but first I have to do it again with FOW v3.
coming soon to a blog near you:

The Defence of Hondeghem:27th May 1940, FOW

Wednesday 25 July 2012

Devils Charge - game 1

Battle Fronts Fow of war latest offering; Devils Charge, is the 1st instalment in a series of Army list books for the 1944 German Ardennes Offensive.
Having now previewed a copy, I am not going to delve into the details but my Initial thoughts on the book is "That it is the best peice of historical Fiction I have ever seen" and I am yet to be convinced otherwise, but it is for you to make your own mind up.

Moving on.  I purchased on a whim, July's edition of Wargames Illustrated and noticed that it had a mini campaign with-in its glossy pages depicting Peiper's rapid advance. So having convinced a willing victim... Game On!

Game 1 of 3

PEIPER'S CHARGE

Setting up the table as in the magazines article, we noticed a few irregularities in the scenario notes.

Points: The Germans are short by 105 points?  

A quick look through the lists revealed that the ME 262 Air support was 105 points.  We discussed whether the fact that this was a coincidence or it had been the original plan to include the ME 262 and it was decided to be too effective so had been replayed without it.

We decided to add the ME 262 from turn 3, only arriving on a roll of 6 to limit its impact.

Off Road Movement?

Off road movement is considered as Slow going with out bogging checks due to snow. Looking at the rules, unless we missed something, Slow going is not an option, so we assumed that they meant to move as if it was bad going.

Woods?

It states that the Ardennes region is a heavily wooded area with areas of open woods (Plantations?) so do not treat woods as Area terrain and are not considered bad going and troops within them are concealed.  So now we are playing an Ardennes game with NO woods.  So we played the woods as offering concealment and block LOS.

The Game....
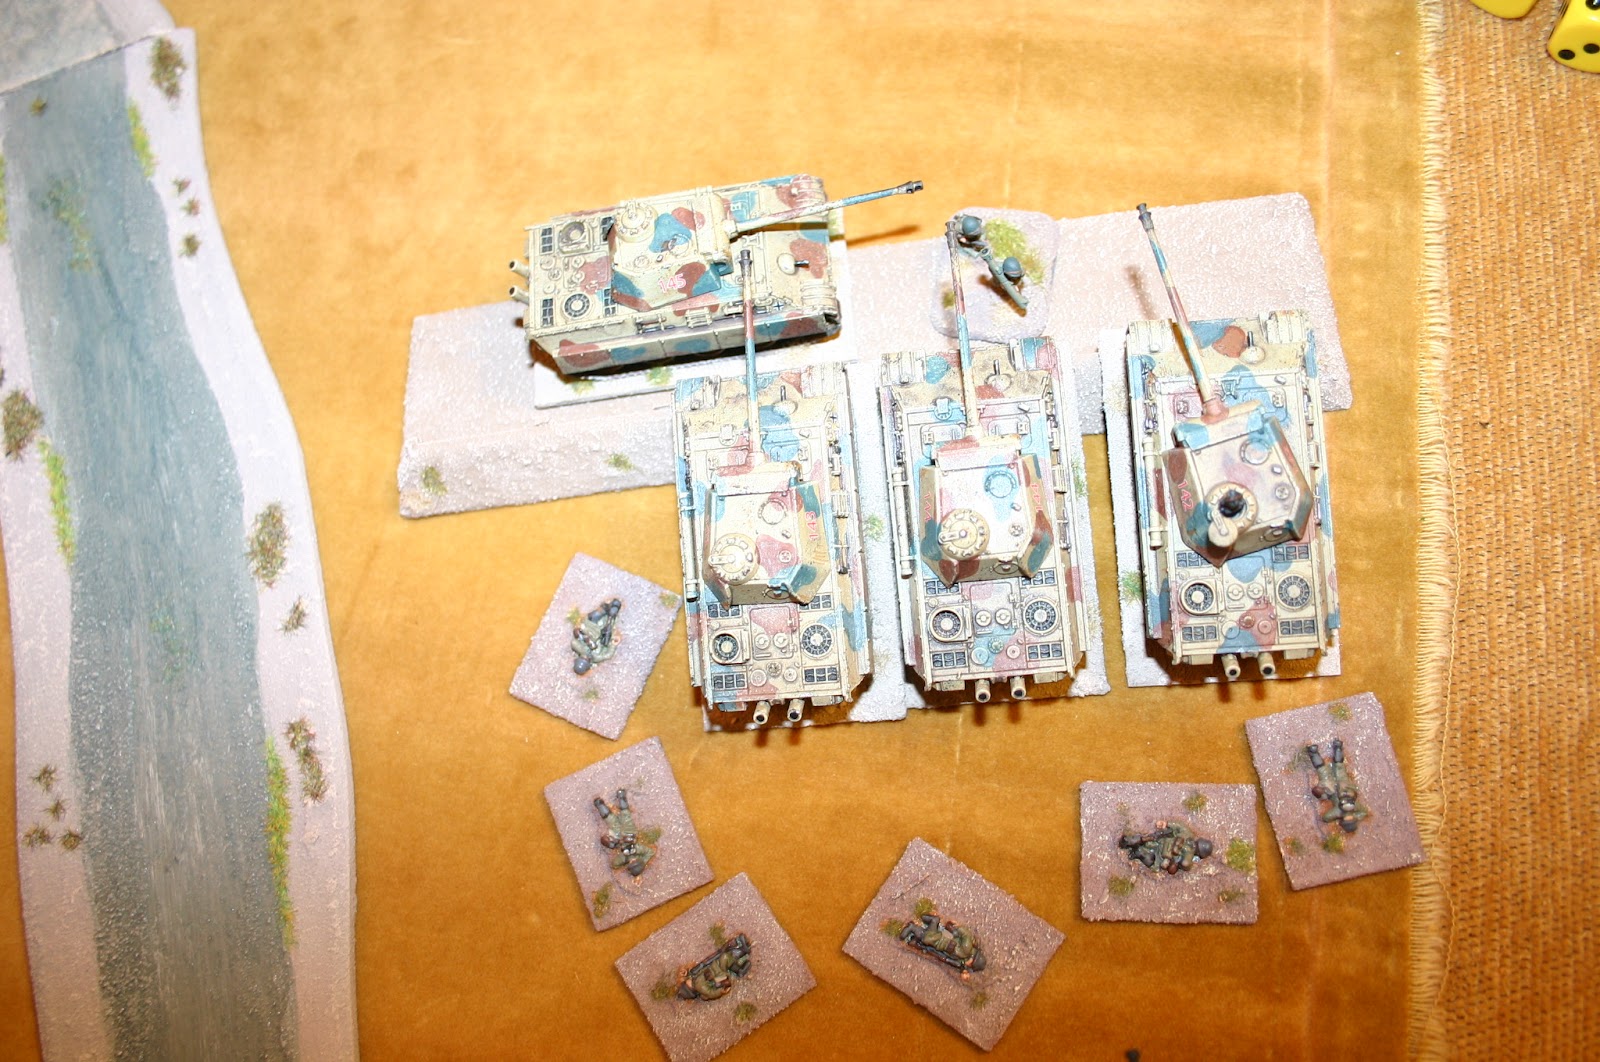
4000 points of Germans line up: 9 Panthers, 8 panzer IV's, 2 Tiger 2's, 4 Wirblewinds (Sdkfz 7 proxies), 6 Grills (Marder and Lorraine Proxies), 2 armoured infantry Platoons and a Fallshirmjager platoon, plus Air support...ME 262

End of German movement phase, Turn 1

Turn 1
8 turns to rach the other end of the table (6 feet). The road jam begins, The Fallshirmjager deployed on table adjacent to the mine field whilst a column of vehicles arrive behind. First to arrive were the 2 Panzer IV platoons and the Panthers, which spread out to provide covering fire. The Fallshirmjager cleared the booby trap and mine field and also started an assault on the defending American Platoon. 
Fallshirmjager Looses 2 stands to the US 1. The US platoon falls back into the house at the bottom of the trench line as the assault had come from the top house.
In the American turn they  un-pin and machine gun 2 stands of the Fallshirmjager
End off turn 2
Turn 2
The Fallshirmjager unpin and supported by massed fire from the tanks assault the small US platoon and wipe it out, consolidating towards the next town.  It slowly dawns on me that 8 turns to reach the other end of the table may not be enough what with the road blocked by the barbed wire and trench line slowing the tanks down even more.
German Armour pour from the town.
Turn 3
Nothing to stop them, The German Armour pour from the town with the lead PzIV platoon racing towards the next town and their objective; The fuel Dump.  Peiper advances protected by the remnant's of the Fallshirmjager. The Sig's move into position to lend long range support.
The German air support arrives and bails a M10, The two lead Panzer IV's finish it off.
I remember to do my Storm trooper move which I forgot to do turn 1.
Then the Americans turn up the heat....
US Air support arrive to ruin the day.
Hmmm...This is where I loose half my force in one go, I thought. But unfortunately for the Americans there are 4 AA vehicles sat there watching the plane arrive, 24 shots latter and what? aircraft.
Turn 4
With every thing now struggling to move on the road I start to move across country straight towards the exit at the far end off the table. The panzer Iv's fail to hit the 76mm Sherman's facing them. The SiG's hit the two 76mm Sherman's with indirect fire and blow one up. In the assault phase the Fallshirmjager move towards the American platoon defending the town and engages them in hand to hand fighting. They loose 1 stand to defensive fire but manage to kill 3 US stands, the Americans then fall back further into the town.
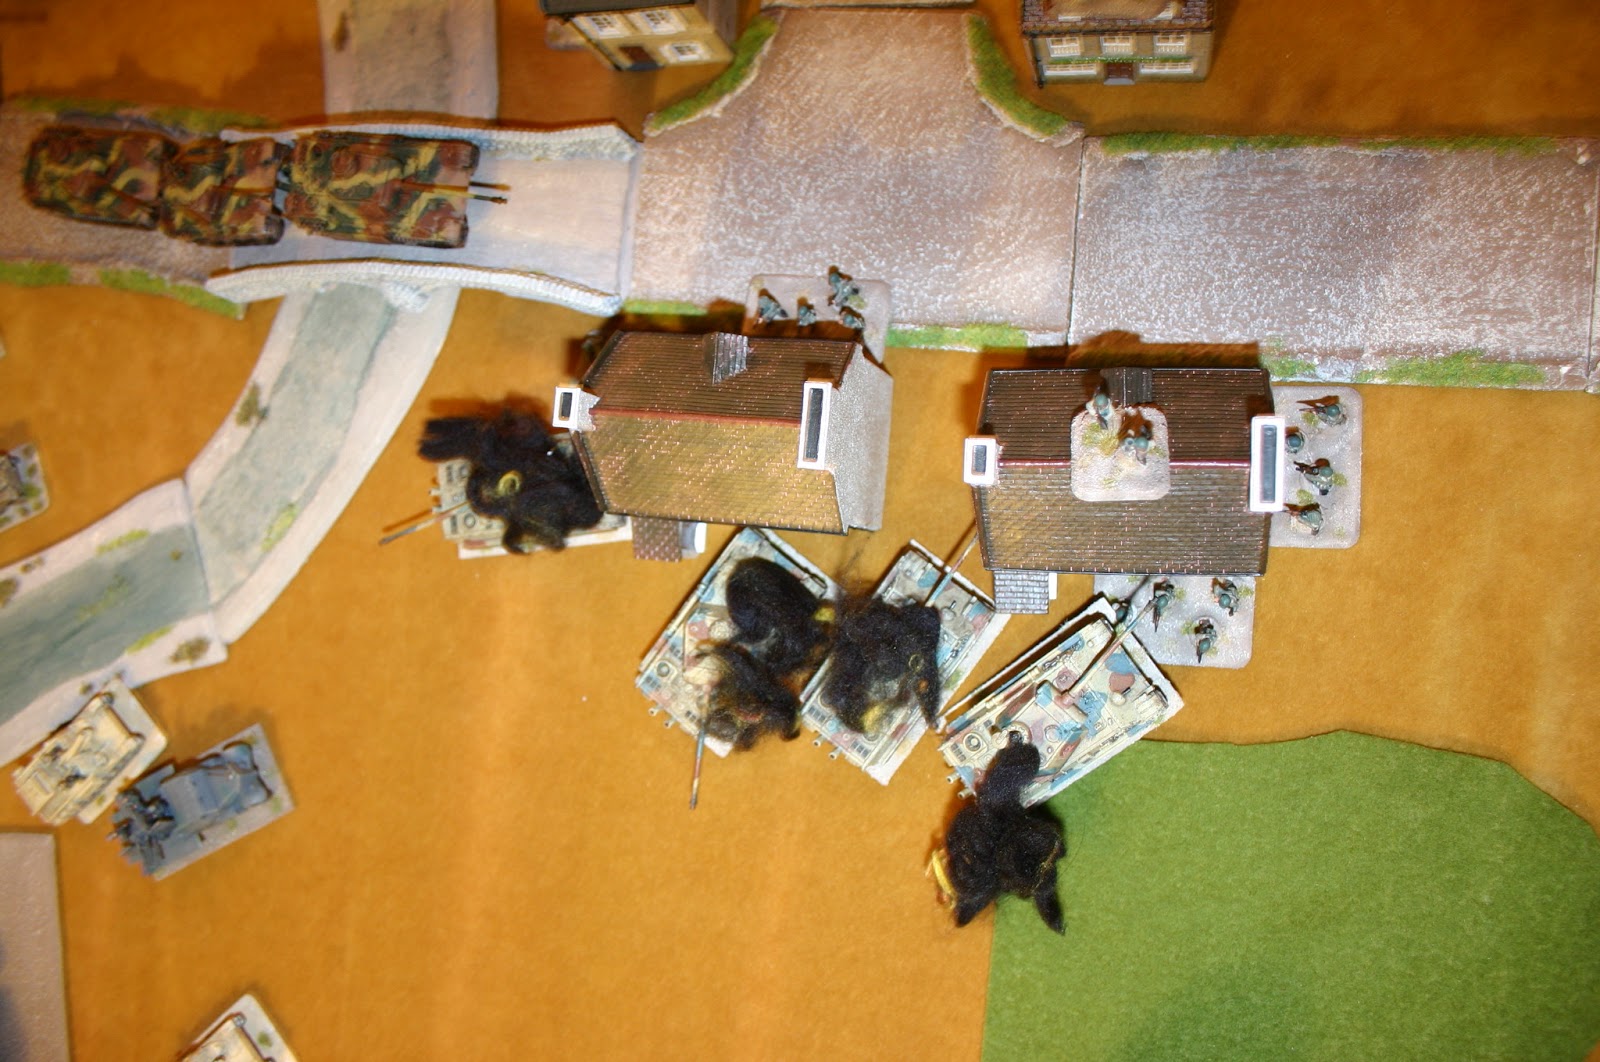
The Americans respond by getting more air support which is in turn chased off by the ME262's. They then Blow up the 2 Panzer IV's leading the charge blocking the road.
The traffic jam continues.
American Armour moves to block the German Advance.
Turn 5
The German advance continues. The last M10 racing to support the beleaguered Infantry platoon is hit and blows up. The Fallshirmjager assault the US infantry again pushing them back beyond the Fuel dump.
The American armour move into the woods to try and flank the advancing panzer's.
Turn 6
The Germans need that Fuel dump as there is no way they can make the deadline over wise. One last push by the Fallshirmjager clears the Americans from the building next to the fuel dump and to my relief  they had enough and promptly surrendered... Later the German's would say "Prisoners...What Prisoners???"
The American Armour manages to bail a Panzer IV, and the Air support was again shot down by the AA, 6 shots, 5 hits, 3 Fire power tests passed.
Turn 7
FUEL!!!!!!!!!!!!!!!!!!!!!!!!!!!!!!!!!!!!!!!!!
With the extra movement gained by the capture of the fuel dump, it was possible for my panzer IV's to reach the objective, only just.
Spurred on by new fuel supplies the Panzer's swarm past the few Americans blocking their way.
With that many tanks now closing in around the Sherman's, they had no chance. 3 long range shots from a Tiger 2 ripped into the front of the 76mm Sherman, the result a smouldering wreck. The last 2 M4's both suffered at the hands of the Panthers now swarming about them.
With nothing Left on table the field belonged to the Germans but there was still one turn left but there was no company morale check in this game so...
Turn 8
USAF roar overhead
With the objective in sight the clouds parted and down came the Thunderbolts of the USAF racing towards Peiper and the lead Panther Platoon...Would they be able to make a difference......
All that stood between the Thubderbolt rockets of doom and the Panther's was the Silent grey hulk of the Flak Panzer..."Whirblewind!!!!!!!!!!!!!!",  Silently it turned its turret and with a deafening roar, cannons blazing, it fired at the oncoming planes.....  for a tense moment all seemed to be lost then the shells found their mark and cut down the Thunderbolts, one after another they fell.. The guns fell silent, shell casing dancing around the turrets floor, The Panzer's had made their first deadline....
...But only just!!!!

Post game

Did the ME 262's make much difference, they turned up once claiming a M10 and intercepted the American planes twice.  But the latter we agreed probably would not have made much difference as I had kept the Wirblewinds back in such a way that they covered the advancing Germans, providing a good protective umbrella.

Rereading the article we did do a few things wrong, forgot the US infantry had a type of British bull dog re roll, but again with the weight of supporting fire from the Panzer's it would not have helped. 

The Fallshirmjager were lucky and a rushed deployment by the Americans did help matters. Clearing the minefield for the Panzer's on turn 1 made a big difference but not being able to use the road movement for 2 turns slowed the tanks down.

Could the American Armour have made a big difference if it had not tried to get to the fuel dump before trying to cut off my Panzer's which had decided to head straight across country towards the table edge objective?  Maybe but the weight of return fire especially from the panthers would have taken care off them, but not before I lost a Panzer IV platoon.

I was lucky, I managed to stave off the USAF and that dreaded rocket attack off theirs and in the next game I need to try and not bunch up as much.

Using the SiG's to bombard the Sherman's was a stoke of genius as it took out one of the 76mm armed Sherman's scaring the other one. In the magazine article the German player use the Sig's to take out the infantry in the buildings, but they were in turn destroyed by an ambushing AT gun platoon.

knowing this I decided not to make the same mistake and kept them back, like wise the Americans stayed out of the buildings.

It was a close run thing and we are not 100% sure as to whether I made it to the objective in time, we shall discuss that before the next game.

German Casualties

2 Panzer IV's
5 Fallshirmjager Stands

COMING SOON GAME 2